Tree Install

Azman

Getting the hang of it
Joined
Mar 8, 2019
Messages
47
Reaction score
47
Location
Canberra, Australia
Hi Guys,

So I got a bit inspired to install a IPC-HDW2231R-ZS that I've had lying around for a while in the cupboard. The inspiration came from a tip-rat doing a burnout on the corner that we live on. I got a decent image from an overview camera (IPC-T5442T-ZE) I have on that corner for the police to follow it up, but wanted something a bit closer.

I'm looking to install it on the tree close to the corner - a la @Parley and his sidewalk tree LPR's. I've installed it temporarily at the moment just to see how it fairs. There are a couple of issues with this location, the main one being that it faces pretty much directly west. So afternoon sunlight will be a big problem for image quality late afternoon when the sun gets low in the sky. The other being it is very close to where people walk by, they seem to cut the corner on our grass rather than walk on the street. I'm debating whether it may be better to install it into a large diameter PVC pipe next to the tree for better covertness for this reason.

There are two street lights on that corner, so there is a fair amount of light at night, but because it sits under the tree canopy I'm not sure how much of that light will benefit the camera.

During the day it seems that the camera can capture people, cars and licence plates really well. Some cars do race up and down the street but it does capture most licence plates. The overview camera helps with those it can't capture. I don't have any captures of cars enteing or exiting the steet from the left (from up the hill) and this doesn't happen too often anyway, but I think it will struggle with the lack of angle in that scenario.

I'd like to be able to capture people and cars at night as well, but not to sure what settings I would need for that, if it's at all possible.

Here are a couple of photo's and some video as it sits now. I've dialed in the daytime settings and it looks pretty good - to my eye at least. Any suggestions very welcome.

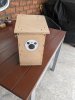
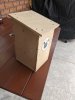
Temporary install on the tree
PXL_20240225_060917497.jpg

View from the camera across the road
PXL_20240225_060933077.jpg

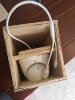
Looking back at the camera
PXL_20240225_061012270.jpg


Dog walker
View attachment walker.mp4


Car travelling downhill (left to right)
View attachment downhill.mp4


Car entering from the right
View attachment entering uphill.mp4


Car travelling uphill (right to left)
View attachment uphill.mp4


Car leaving street left to right (downhill)
View attachment leaving downhill.mp4
 

Attachments

wittaj

IPCT Contributor
Joined
Apr 28, 2019
Messages
25,041
Reaction score
48,824
Location
USA
At night, do you want to capture plates or people - the setup is completely different based on that.

You would have to set the camera up specifically to read plates. You need the proper camera with OPTICAL zoom for the distance you are covering and the angle to get plates.

Regarding plates, keep in mind that this is a camera dedicated to plates and not an overview camera also. It is as much an art as it is a science. You will need two cameras. For LPR we need to OPTICALLY zoom in tight to make the plate as large as possible. For most of us, all you see is the not much more than a vehicle in the entire frame. Now maybe in the right location during the day it might be able to see some other things, but not at night.

At night, we have to run a very fast shutter speed (1/2,000) and in B/W with IR and the image will be black. All you will see are head/tail lights and the plate. Some people can get away with color if they have enough street lights, but most of us cannot. Here is a representative sample of plates I get at night of vehicles traveling about 45MPH at 175 feet from my 2MP 5241-Z12E camera (that is all that is needed for plates):

1675078711764.png


See the LPR subforum for more details.


Now if you just want to be able to capture people and vehicles, in terms of getting the most out of the camera, here is my "standard" post that many use as a start for dialing in day and night that helps get the clean captures and help the camera recognize people and cars.

Start with:

H264
8192 bitrate
CBR
15FPS
15 iframes

Every field of view is different, but I have found you need contrast to usually be 6-8 higher than the brightness number at night.

We want the ability to freeze frame capture a clean image from the video at night, and that is only done with a shutter of 1/60 or faster. At night, default/auto may be on 1/12s shutter or worse to make the image bright.

In my opinion, shutter (exposure) and gain are the two most important parameters and then base the others off of it. Shutter is more important than FPS. It is the shutter speed that prevents motion blur, not FPS. 15 FPS is more than enough for surveillance cameras as we are not producing Hollywood movies. Match iframes to FPS. 15FPS is all that is usually needed.

Many people do not realize there is manual shutter that lets you adjust shutter and gain and a shutter priority that only lets you adjust shutter speed but not gain. The higher the gain, the bigger the noise and see-through ghosting start to appear because the noise is amplified. Most people select shutter priority and run a faster shutter than they should because it is likely being done at 100 gain, so it is actually defeating their purpose of a faster shutter.

Go into shutter settings and change to manual shutter and start with custom shutter as ms and change to 0-8.3ms and gain 0-50 (night) and 0-4ms exposure and 0-30 gain (day)for starters. Auto could have a shutter speed of 100ms or more with a gain at 100 and shutter priority could result in gain up at 100 which will contribute to significant ghosting and that blinding white you will get from the infrared or white light.

Now what you will notice immediately at night is that your image gets A LOT darker. That faster the shutter, the more light that is needed. But it is a balance. The nice bright night static image results in Casper blur and ghost during motion LOL. What do we want, a nice static image or a clean image when there is motion introduced to the scene?

In the daytime, if it is still too bright, then drop the 4ms down to 3ms then 2ms, etc. You have to play with it for your field of view.

Then at night, if it is too dark, then start adding ms to the time. Go to 10ms, 12ms, etc. until you find what you feel is acceptable as an image. Then have someone walk around and see if you can get a clean shot. Try not to go above 16.67ms (but certainly not above 30ms) as that tends to be the point where blur starts to occur. Conversely, if it is still bright, then drop down in time to get a faster shutter.

You can also adjust brightness and contrast to improve the image. But try not to go above 70 for anything and try to have contrast be at least 7-10 digits higher than brightness.

You can also add some gain to brighten the image - but the higher the gain, the more ghosting you get. Some cameras can go to 70 or so before it is an issue and some can't go over 50.

But adjusting those two settings will have the biggest impact. The next one is noise reduction. Want to keep that as low as possible. Depending on the amount of light you have, you might be able to get down to 40 or so at night (again camera dependent) and 20-30 during the day, but take it as low as you can before it gets too noisy. Again this one is a balance as well. Too smooth and no noise can result in soft images and contribute to blur.

Do not use backlight features until you have exhausted every other parameter setting. And if you do have to use backlight, take it down as low as possible.

After every setting adjustment, have someone walk around outside and see if you can freeze-frame to get a clean image. If not, keep changing until you do. Clean motion pictures are what we are after, not a clean static image.
 

Parley

Known around here
Joined
Dec 19, 2015
Messages
5,628
Reaction score
16,042
Location
Cypress, California
Down the road if you want to hide the camera a little better, you could get a black bullet style camera and possible fit it in the "notch" slightly above where the camera is now. Then have the mounting and cabling on the backside of the tree. The other ideas as posted above will also work.
 
Last edited:

Mike A.

Known around here
Joined
May 6, 2017
Messages
3,835
Reaction score
6,400
Not sure what phone you have. Search for turn off photo geotagging and iPhone or Android and you'll find the steps. You can either turn it off for all photos or you can leave it on and manually delete the location data from selected photos as you want. Depends how you want it to work. Some people like having things tagged so they can search or group things by location. I leave mine off.
 

Mike A.

Known around here
Joined
May 6, 2017
Messages
3,835
Reaction score
6,400
Down the road if you want to hide the camera a little better, you could get a black bullet style camera and possible fit it in the "notch" slightly above where the camera is now. Then have the mound and cabling on the backside of the tree.
Was going to say the same. That will largely hide it and the black makes a big difference.
 

Azman

Getting the hang of it
Joined
Mar 8, 2019
Messages
47
Reaction score
47
Location
Canberra, Australia
At night, do you want to capture plates or people - the setup is completely different based on that.

You would have to set the camera up specifically to read plates. You need the proper camera with OPTICAL zoom for the distance you are covering and the angle to get plates.


Now if you just want to be able to capture people and vehicles, in terms of getting the most out of the camera, here is my "standard" post that many use as a start for dialing in day and night that helps get the clean captures and help the camera recognize people and cars.

Start with:

H264
8192 bitrate
CBR
15FPS
15 iframes

Every field of view is different, but I have found you need contrast to usually be 6-8 higher than the brightness number at night.
Thanks for this. very informative.

I think at this point I just want to capture people and cars at night.....not plates at night........i'll go down that rabbit hole later......

I will do some tweaking tonight and report back on my results.
 

CCTVCam

Known around here
Joined
Sep 25, 2017
Messages
2,676
Reaction score
3,506
Positioning looks good. What I would do is put the connector in a waterproof junction box (as small as possible) using the bottom entry points ony and run the wiring through conduit both from the house, up the tree and from the rj45 connector in the junction box to the camera. If you don't someone will probably unplug the camera or cut the wires. If you look on here at other people's projects, they've done this and spray painted the conduit, junction box, camera to match the tree. Some have evn wound around some Ghilli suit style camouflage stuff with stick out leaves etc to make the conduit look like a vine and disguise junction boxes etc better. It's your choice whether youi want the camera covert or overt, personally I'd go with covert in a vulnerable location, but camera aside, you need to protect the wiring if only because the local youth will probably find it funny to cut it which could cost you a lot in re-wiring the poe or a new camera if they cut the pigtail close to the camera itself.
 

Azman

Getting the hang of it
Joined
Mar 8, 2019
Messages
47
Reaction score
47
Location
Canberra, Australia
So I did some fiddling last night and this is what I came up with......just trying to workout whether I can get better than this for people and cars.....not really interested in licence plates at the moment for this cam

Settings

night - exposure settings.JPGnight - picture settings.jpg

Backlight = OFF
WB = Streetlamp
Day & Night = B/W
IR Light = SmartIR

Some videos
View attachment night car uphill.mp4
View attachment night walker close uphill.mp4
View attachment night car downhill.mp4
View attachment night far walker.mp4
View attachment night close walker.mp4
 

Azman

Getting the hang of it
Joined
Mar 8, 2019
Messages
47
Reaction score
47
Location
Canberra, Australia
OK. So I've made a little progress with this.

After some thought I've decided not to attach the cam directly to the tree, but instead mount it in a faux bird box to disguise it a bit. Here is what I've come up with thus far.

The box is 9mm marine ply, about 150mm square by about 240-270mm high. I used a 76mm hole saw for the lens which fits perfectly.

Still need to camo it with some appropriate paint.

I'll post more pics when I get around to sealing, painting and mounting it. But all in all I am very pleased with how it looks so far.

Not too sure about whether to just have the cable connection in the box, or have a separate weatherproof junction box mounted to the tree, or a weatherproof junction box inside the box. Any thoughts?

Cheers,
Aaron
 

Attachments

Top