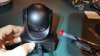
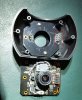
So a couple of weeks ago the first IP camera I ever bought, a Foscam 480p Pan Tilt camera finally died. Although its image quality was horrible, we actually made use of it for several years as a way to look around the ground floor of our vacation home when we aren’t up there.
My first inclination was to replace the camera with 2 or 3 Hikvision cubes, but on a whim, I decided to search Aliexpress to see if I could find an inexpensive 1080p PT camera that looked like it might be compatible with Blue Iris.
The camera that caught my eye was the VStacam C29S 1080P Full HD Wireless IP Camera CCTV WiFi Home Surveillance Security Camera System Indoor PTZ Camera-in Surveillance Cameras from Security & Protection on Aliexpress.com | Alibaba Group

What made it worth the gamble to me?
I ordered the camera on 26 Jan, and received it on 2 Feb. When the camera arrived, I plugged it into power and ethernet and scanned for it using Fing. Fing found it with a DHCP assigned IP address of 192.168.1.171, but Fing’s scan of services did not report any open ports.
I downloaded the Eye4 app that the documentation called out. Eye4 connected to the camera just fine. The first thing the app made me do was set an admin password. From what I’ve read, I believe the default password for admin is 888888.
Once I knew that the camera was alive, I downloaded nmap and had it run an intense scan of all TCP ports. Nmap reported 4 open ports:
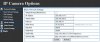
With admin as the username and the admin password I had set via the app, the ONVIF Device Manager (ODM) was able to connect with the camera. Under the ODM display of the Network settings for the camera ODM also identified the RTSP port as 10554 and the HTTP port as 42150.
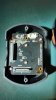
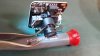
Using Internet Explorer to browse to port 42150 of the camera’s IP address opened a login dialog box where I logged in as admin. That took me to a screen where I downloaded and installed an ActiveX control for the camera. Navigating around in the camera’s UI is pretty intuitive. Under the camera settings, one of the first things I did was to disable UPnP and DDNS, even though I had already set my router to block all access to the internet from the device.
I also tweaked a couple of other settings including setting the refresh rate to 60 HZ and the Bitrate to 2048kbps, and then rebooted the camera. This is when I ran into my next surprise. When the camera came back up I couldn’t reach the camera’s web page to log back in. After a brief panic I did a refresh in ODM and found that the HTTP port had changed from 42150 to 45870. To make a long story short, it appears that when the camera obtains its address via DHCP it also sets it HTTP port to what seems to be a random port. After I changed the camera’s network settings to a static address, its HTTP port has stayed constant to the value set on the network settings page.

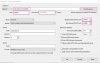
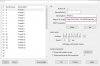
Next step was to get things working in Blue Iris… In Blue Iris I added a new camera, and in the camera’s properties Video>Network IP>Configure window, I set the IP Address, User, Password, RTSP port and ONVIF port. Then the Find/Inspect button set the camera as follows:

Then I enabled audio, and BI was streaming video and audio from the camera.

The Find/inspect also set up PTZ control, as the direction arrows in the BI worked fine using the settings that were set.

What didn’t work was trying to call or set a preset from BI.
Since the web UI allowed me to set and call presets, I set up Wireshark and captured traffic while playing around with presets in the web UI. Wireshark turned up that the call of preset 1 generated the following:
I tried leaving out parameters to shorten the url, and the following still worked:
Additional call and set examples in their shortened form:
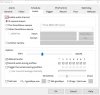
Armed with this information, I went into Camera Properties>PTZ/Control?Edit Presets… and entered the HTTP command to call each of the presets.

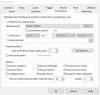
Since these commands are sent in the clear, I created an operator account on the camera and am using its credentials in the HTTP commands to call the presets. An operator account can control the camera, but can’t change any settings.
Since I’m not planning on using more than 5 presets, I made presets 1-5 send the HTTP commands to call presets 1-5, and presets 11-15 to send the HTTP commands to set presets 1-5. Since an operator account can’t set presets, I had to use the admin credentials in the HTTP commands for presets 11-15.
At this point the only functionality I still would like to get working in BI, but so far have had no luck with, is 2-way audio. Audio capture from the camera sounds pretty good, but I haven’t found any settings that will let me send audio to the camera. The Eye4 app can do it, and using that app, the voice quality of audio sent to the camera is good enough to be easily understood. If 2-way audio was terribly important I’d probably renew my BI support agreement and see whether Ken and crew could get it working.
Image quality on the C29s is pretty darn good for a $50 camera.
Here is a daytime image at the camera's default image settings

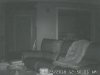
Here is the night time image, again at default settings, and with no illumination other than the camera's built in IR. And for a frame of reference, the entry door shown in the image is 26 feet from the camera:

Compare those to the following day and night images from the Foscam it replaced, and you might be able to tell why Foscam cameras sometimes garner the name Foscrap around here...


All in all I'm very pleased with the purchase. In fact I've already ordered 2 more cameras that are supposed to be here Saturday, and at the current price and after applying a couple of store coupons the seller makes available, this order ended up being $98 for 2 cameras.
My first inclination was to replace the camera with 2 or 3 Hikvision cubes, but on a whim, I decided to search Aliexpress to see if I could find an inexpensive 1080p PT camera that looked like it might be compatible with Blue Iris.
The camera that caught my eye was the VStacam C29S 1080P Full HD Wireless IP Camera CCTV WiFi Home Surveillance Security Camera System Indoor PTZ Camera-in Surveillance Cameras from Security & Protection on Aliexpress.com | Alibaba Group
What made it worth the gamble to me?
- 1080p pan/tilt
- IR
- ONVIF
- $55 shipped from US
I ordered the camera on 26 Jan, and received it on 2 Feb. When the camera arrived, I plugged it into power and ethernet and scanned for it using Fing. Fing found it with a DHCP assigned IP address of 192.168.1.171, but Fing’s scan of services did not report any open ports.
I downloaded the Eye4 app that the documentation called out. Eye4 connected to the camera just fine. The first thing the app made me do was set an admin password. From what I’ve read, I believe the default password for admin is 888888.
Once I knew that the camera was alive, I downloaded nmap and had it run an intense scan of all TCP ports. Nmap reported 4 open ports:
Code:
PORT         STATE        SERVICE              VERSION
9600/tcp     open         tcpwrapped
10080/tcp    open         amanda?
10554/tcp    open         rtsp
42150/tcp open http GoAhead WebServerUsing Internet Explorer to browse to port 42150 of the camera’s IP address opened a login dialog box where I logged in as admin. That took me to a screen where I downloaded and installed an ActiveX control for the camera. Navigating around in the camera’s UI is pretty intuitive. Under the camera settings, one of the first things I did was to disable UPnP and DDNS, even though I had already set my router to block all access to the internet from the device.
I also tweaked a couple of other settings including setting the refresh rate to 60 HZ and the Bitrate to 2048kbps, and then rebooted the camera. This is when I ran into my next surprise. When the camera came back up I couldn’t reach the camera’s web page to log back in. After a brief panic I did a refresh in ODM and found that the HTTP port had changed from 42150 to 45870. To make a long story short, it appears that when the camera obtains its address via DHCP it also sets it HTTP port to what seems to be a random port. After I changed the camera’s network settings to a static address, its HTTP port has stayed constant to the value set on the network settings page.
Next step was to get things working in Blue Iris… In Blue Iris I added a new camera, and in the camera’s properties Video>Network IP>Configure window, I set the IP Address, User, Password, RTSP port and ONVIF port. Then the Find/Inspect button set the camera as follows:
Then I enabled audio, and BI was streaming video and audio from the camera.
The Find/inspect also set up PTZ control, as the direction arrows in the BI worked fine using the settings that were set.
What didn’t work was trying to call or set a preset from BI.
Since the web UI allowed me to set and call presets, I set up Wireshark and captured traffic while playing around with presets in the web UI. Wireshark turned up that the call of preset 1 generated the following:
Code:
http://192.168.1.171:45870/decoder_control.cgi?loginuse=admin&loginpas=<admnPWD>&command=31&onestep=0&sit=31&15177779392790.596182108365143&_=1517777939279
Code:
http://192.168.1.171:45870/decoder_control.cgi?loginuse=admin&loginpas=<admnPWD>&command=31&onestep=0Additional call and set examples in their shortened form:
Code:
Call preset 2  = http://192.168.1.171:45870/decoder_control.cgi?loginuse=admin&loginpas=<admnPWD>&command=33&onestep=0
Call preset 3  = http://192.168.1.171:45870/decoder_control.cgi?loginuse=admin&loginpas=<admnPWD>&command=35&onestep=0
Call preset 16 = http://192.168.1.171:45870/decoder_control.cgi?loginuse=admin&loginpas=<admnPWD>&command=61&onestep=0


Set preset 1   = http://192.168.1.171:45870/decoder_control.cgi?loginuse=admin&loginpas=<admnPWD>&command=30&onestep=0
Set preset 2   = http://192.168.1.171:45870/decoder_control.cgi?loginuse=admin&loginpas=<admnPWD>&command=32&onestep=0
Set preset 3   = http://192.168.1.171:45870/decoder_control.cgi?loginuse=admin&loginpas=<admnPWD>&command=34&onestep=0
Set preset 16 = http://192.168.1.171:45870/decoder_control.cgi?loginuse=admin&loginpas=<admnPWD>&command=60&onestep=0Since these commands are sent in the clear, I created an operator account on the camera and am using its credentials in the HTTP commands to call the presets. An operator account can control the camera, but can’t change any settings.
Since I’m not planning on using more than 5 presets, I made presets 1-5 send the HTTP commands to call presets 1-5, and presets 11-15 to send the HTTP commands to set presets 1-5. Since an operator account can’t set presets, I had to use the admin credentials in the HTTP commands for presets 11-15.
At this point the only functionality I still would like to get working in BI, but so far have had no luck with, is 2-way audio. Audio capture from the camera sounds pretty good, but I haven’t found any settings that will let me send audio to the camera. The Eye4 app can do it, and using that app, the voice quality of audio sent to the camera is good enough to be easily understood. If 2-way audio was terribly important I’d probably renew my BI support agreement and see whether Ken and crew could get it working.
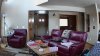
Image quality on the C29s is pretty darn good for a $50 camera.
Here is a daytime image at the camera's default image settings
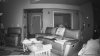
Here is the night time image, again at default settings, and with no illumination other than the camera's built in IR. And for a frame of reference, the entry door shown in the image is 26 feet from the camera:
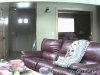
Compare those to the following day and night images from the Foscam it replaced, and you might be able to tell why Foscam cameras sometimes garner the name Foscrap around here...
All in all I'm very pleased with the purchase. In fact I've already ordered 2 more cameras that are supposed to be here Saturday, and at the current price and after applying a couple of store coupons the seller makes available, this order ended up being $98 for 2 cameras.
Attachments
-
 121.6 KB Views: 127
 -
 61.4 KB Views: 134
 -
 76.4 KB Views: 135
 -
 101 KB Views: 127
 -
 114.2 KB Views: 131
 -
 84 KB Views: 131
 -
 1,003.8 KB Views: 136
 -
 602.2 KB Views: 135
 -
 187.1 KB Views: 131
 -
 125 KB Views: 134