
Start by doing a reset to factory defaults with the Amcrest firmware, then do your firmware upgrade. When that is finished, you may need to do another reset to factory defaults once you are in with Dahua firmware-- the digital Amcrest logo may still be there. After that reset and restart, set it up the way you want it.Thank you sdkid! Did you have to downgrade the stock Amcrest firmware first or was it a straightforward upgrade via the web portal?
New Amcrest IP5M-T1179EW-36MM graphical glitches and freezing runs hot?
- Thread starter Safetyfirst
- Start date
You are using an out of date browser. It may not display this or other websites correctly.
You should upgrade or use an alternative browser.
You should upgrade or use an alternative browser.

When running cable through a building, you buy bulk cable. 1000 feet to a box usually. then you cut it and put an end on it. if your pulling 2 or 3 runs at the same time you tape the ends together and use a nylon pull string to push or pull it thru walls, ceilings, etc....
Thank you! Very cool (I am a total noob)
Start by doing a reset to factory defaults with the Amcrest firmware, then do your firmware upgrade. When that is finished, you may need to do another reset to factory defaults once you are in with Dahua firmware-- the digital Amcrest logo may still be there. After that reset and restart, set it up the way you want it.
Very grateful for your detailed instructions. You are a total lifesaver!!
S
Sorry, I know it's been a while but how do you open the camera up?
I recently got my hands on this rebranded Dahua camera from Amcrest. The heat issue is sort of two-part...
1) The heat radiated outward is somewhat shunted due to the plastic casing. Metal to metal conducts and dissipates heat better - think of it as a poor-man heatsink on a computer, in our case, a CCTV camera. Metal to plastic, well, not so much in that regard. So where does the heat go? To the entire metal apparatus.
2) You will need to open up the camera and remove the silica bag wedged between the camera sensor metal PCB+plating and the control board PCB. There is a HUGE silica bag below the main PCB - which is well more than enough to consume all the humidity. Removing the small bag wedged between the two PCB's greatly reduced the heat contained within the camera internals. It now idles at 103 to 104F. It also concerned me that there's a Thermal Pad on the metal plating from the top inside the camera plate, which fits next to the bottom of the internal casing. This was effectively telling me this device does get rather warm. Prior to the removal of the smaller silica bag wedged between the two segments, I was seeing temperatures anywhere between 115 to 135F! This is not an ideal temperature for a CCTV camera, especially if it were to be mounted outdoors, and even more so if it was in direct/partial sunlight for a portion of the day. That temperature would skyrocket, and well - would likely spell the end for the camera.
Added what I am seeing from UniFi's POE switch port for this unit...
The values ranged and were always lightly-dynamic. Oddly enough, voltage with IR on resulted in very stable voltage values.
- Lit area, no IR active:
- Voltage: 53 – 53.25 Volts
- Current: 46 – 54 mA
- Wattage: 2.4 – 3.3 Watts
- Non-lit area, IR cut, and IR LEDs on @100%:
- Voltage: 53.10 Volts
- Current: 64 – 67 mA
- Wattage: 2.5 – 4 Watts
Sorry, I know it's been a while but how do you open the camera up?
I definitely thought the same thing regarding the plastic housing.
The tip on the SILICA bag--- fantastic! I will pull mine down again and open it up... Thanks!!


Hi sdkid, did you end up opening up your camera to remove the silica bag? If you could you enlighten me how to open the camera? Does it involve removing the "metal bag" from the "plastic socket" first?
bctrainers
Young grasshopper
Unless they've changed the design, there are three screws on the backside of the camera ball. A generic Phillips head screwdriver (either #3 or #2 type - don't recall which one) is all you need to remove those three screws. You may also need to remove the oval cap that says RESET - it's a slot for the reset button and SDCard.S
Sorry, I know it's been a while but how do you open the camera up?
Attachments
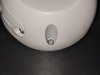
Unless they've changed the design, there are three screws on the backside of the camera ball. A generic Phillips head screwdriver (either #3 or #2 type - don't recall which one) is all you need to remove those three screws. You may also need to remove the oval cap that says RESET - it's a slot for the reset button and SDCard.
Thank you so much for your time and explanation!
It is actually a JIS philips screw. They have a little different angle on the screw driver. Is you do a lot of Asian screws, it is worth getting a set.Unless they've changed the design, there are three screws on the backside of the camera ball. A generic Phillips head screwdriver (either #3 or #2 type - don't recall which one) is all you need to remove those three screws. You may also need to remove the oval cap that says RESET - it's a slot for the reset button and SDCard.
I found the tiny screws I fought to get out, come out with little force when you have the right driver.
Flintstone61
Known around here
I’m not saying anything about “ a lot of asian screws”
Although my gf is from Da Nang.
Although my gf is from Da Nang.


Flintstone61
Known around here
Maybe we should call them Fasteners due to all the excitement screws can cause.