External microphone install

darre937

n3wb
Joined
Jan 4, 2022
Messages
9
Reaction score
1
Location
United States
Okay I'm sorry if this has been answered. I've searched here and google for anything I can think of without finding what I'm looking for.

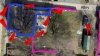
My house is 240 years old, on a semi-busy main road. Due to not just for security, but for general surveillance of the road (accidents, reckless drivers and the such) I have the cameras mounted on the top of the house. I have high cameras for a wide view. Low cameras to get a closer picture The top of the eves are 30ft high. Over the years there has been what I can tell a total of 5 additions to the house, so when looking at my picture don't ask questions about heights and why cameras are laid out how they are just know I had a reason why its like that.

The pink lines are the 6ft fence
The red are the cameras. Obviously not accurate field of views.
The blue is the outline of the physical house.

From the house to the shed I have a point to point network bridge that feeds in to a 12 port switch inside the shed. The shed has power. There is power anywhere I need it inside the house.

Blue Iris computer specs:


CPU: AMD Ryzen 7 5700G (Cezanne, CZN-A0)
3800 MHz (38.00x100.0) @ 4398 MHz (44.00x100.0)
Motherboard: MSI MPG B550 GAMING PLUS (MS-7C56)
BIOS: 1.A0, 05/21/2022
Chipset: AMD B550 (Promontory PROM19 C)
Memory: 131072 MBytes @ 3600 MHz, 18-22-22-42
- 32768 MB PC32000 DDR4 SDRAM - Corsair
- 32768 MB PC28700 DDR4 SDRAM - Corsair
Graphics: AMD Cezanne - Internal GPU [AMD]
AMD Radeon Vega, 4096 MB DDR4 SDRAM
Drive: WDC WD80EDAZ-11TA3A0, 7814.0 GB, Serial ATA 6Gb/s @ 6Gb/s
Drive: ST2000DM008-2FR102, 1953.5 GB, Serial ATA 6Gb/s @ 6Gb/s
Drive: WDC WD20EARS-42S0XB0, 1953.5 GB, Serial ATA 3Gb/s
Drive: ST8000DM004-2U9188, 7814.0 GB, Serial ATA 6Gb/s @ 6Gb/s
Drive: ST3750640NS, 732.6 GB, Serial ATA 3Gb/s
Drive: SEAGATE ST3750640NS, 732.6 GB, Serial ATA 1.5Gb/s
Drive: ST3750640NS, 732.6 GB, Serial ATA 3Gb/s
Drive: SEAGATE ST3750640NS, 732.6 GB, Serial ATA 1.5Gb/s
Drive: TOSHIBA DT01ACA200, 1953.5 GB, Serial ATA 6Gb/s @ 6Gb/s
Drive: WDC PC SN530 SDBPNPZ-256G-1002, 250.1 GB, NVMe
Sound: ATI/AMD Renoir/Cezanne - Display HD Audio Controller
Sound: AMD Zen - Audio Processor - HD Audio Controller
Network: RealTek Semiconductor RTL8168/8111 PCI-E Gigabit Ethernet NIC
Network: Surface Ethernet Adapter
OS: Microsoft Windows 10 Professional (x64) Build 19044.1806 (21H2)

Ok I think that y'all should have a good idea of my set up now.

On to what I need help with.


Due to some "issues" with a former family member I need to have better audio recording. The microphones on the cameras are all either too far/too high to get clear recordings.

How can I add external mics to Blue Iris? 3-4 of them. By where I park in the back, on the back of the house, the front door, and possibly on the side if still needed. Stealth is a factor. They need to be WIFI/IP. Either is fine. But I cant run RCA cables some 140ft from where the NVR is to the very back of my yard without some sort of quality loss.

None of the cameras have a mic input on them.

I live in a one party state. There is also signs about video/audio recordings. Legally I'm in the clear, as I'm sure someone will come back with how I can't record audio.

Thanks for any and all help.
 

Attachments

sebastiantombs

Known around here
Joined
Dec 28, 2019
Messages
11,511
Reaction score
27,702
Location
New Jersey
What make and models are the cameras? Many have an audio in port. If they do it's simply a matter of buying an externally powered microphone, a PoE splitter and a "Y" cable then plug everything in.
 

darre937

n3wb
Joined
Jan 4, 2022
Messages
9
Reaction score
1
Location
United States
What make and models are the cameras? Many have an audio in port. If they do it's simply a matter of buying an externally powered microphone, a PoE splitter and a "Y" cable then plug everything in.
Oh man, Wyze, RLC-520A and c500. I've kinda of been piecing it all together
 

sebastiantombs

Known around here
Joined
Dec 28, 2019
Messages
11,511
Reaction score
27,702
Location
New Jersey
I don't think any of those cameras offer audio inputs like the Dahua and Hikvision models do. I'd suggest trying a Dahua or Hikvision. You'll be amazed at the difference in video and gain the audio functionality.
 

Teken

Known around here
Joined
Aug 11, 2020
Messages
1,677
Reaction score
2,990
Location
Canada
I’ll second what the other member noted. It’s not going to happen with the hardware you have in place now.

Time to save up and purchase a few prosumer video security cameras. Everyone has to start from somewhere and as time goes by they get a taste of OK, Great, to Fantastic.

There are hundreds of cameras from both Dahua / Hikvision that meet almost any budget. Absolutely no reason to by a analog camera or the latest rage from Arlow, Blink, Ring, etc.
 

darre937

n3wb
Joined
Jan 4, 2022
Messages
9
Reaction score
1
Location
United States
I’ll second what the other member noted. It’s not going to happen with the hardware you have in place now.

Time to save up and purchase a few prosumer video security cameras. Everyone has to start from somewhere and as time goes by they get a taste of OK, Great, to Fantastic.

There are hundreds of cameras from both Dahua / Hikvision that meet almost any budget. Absolutely no reason to by a analog camera or the latest rage from Arlow, Blink, Ring, etc.
Unfortunately upgrading cameras is not in the budget at the current time. In the next 3-6 months I should be able to one by one upgrade. But for the moment I need to try and record audio outside while I am fighting in court with my former family member.
 

Teken

Known around here
Joined
Aug 11, 2020
Messages
1,677
Reaction score
2,990
Location
Canada
Given none of your cameras have a audio input that’s going to be hard. You could red neck some possible break fix solutions from buying a cheap digital recorder and placing it close to the target area.

You could purchase a wired 3.5 / USB microphone and connect it to a computer running any of a dozen free recording software for longer audio storage and running the same to those locations.

In the most extreme you could by any wireless headset power it up to a power bank and record the same on the PC. The latest BLE headsets offer more than 25’ connectivity and some push 50’ easily.

Hard wiring is the most direct and low cost but requires sweat equity to install. Everything else just cost money and the willingness to execute the goal.

Let us know what you do and how it turns out Good / Bad.
 

darre937

n3wb
Joined
Jan 4, 2022
Messages
9
Reaction score
1
Location
United States
Given none of your cameras have a audio input that’s going to be hard. You could red neck some possible break fix solutions from buying a cheap digital recorder and placing it close to the target area.

You could purchase a wired 3.5 / USB microphone and connect it to a computer running any of a dozen free recording software for longer audio storage and running the same to those locations.

In the most extreme you could by any wireless headset power it up to a power bank and record the same on the PC. The latest BLE headsets offer more than 25’ connectivity and some push 50’ easily.

Hard wiring is the most direct and low cost but requires sweat equity to install. Everything else just cost money and the willingness to execute the goal.

Let us know what you do and how it turns out Good / Bad.

GENIUS!!!!!! Why did I not thank about this?!?!?!

RaspberryPi ➡USB audio input ➡Outdoor mic

Stream using Darkice ➡ BlueIris
 

Teken

Known around here
Joined
Aug 11, 2020
Messages
1,677
Reaction score
2,990
Location
Canada
Let us know how it all turns out. Using a RPI for sure allows you to do almost anything from powering it up via battery pack, connected via WiFi, and obviously sending a RTSP stream if a camera is mounted.

Adding a microphone is just a Plug & Play affair . . .

Good Luck - Rock On! :thumb:
 

nabman

n3wb
Joined
Sep 3, 2020
Messages
8
Reaction score
6
Location
NY
This is indeed genius! Has anyone tried this yet?

I think I need to find myself an USB mic now - no shortage of RPis connected to the lan ... :)
 

nabman

n3wb
Joined
Sep 3, 2020
Messages
8
Reaction score
6
Location
NY
Are you a BOT?
No ... very much of flesh and blood from the last time I bit my tongue! Hopefully you are not one? ;)

I was looking for a way to include audio only 'cameras' in BlueIris ... my current cameras don't have mics and I don't want to replace my cameras.
I've managed to do it (since I posted the last time) !

In a nutshell, the idea is to use a small sbc (e.g. raspberry pi or smaller) and connect usb mics to it. Then run a RTMP server on the sbc and stream the audio via the server. BlueIris needs a video track so I just added static jpg image in a loop.

I was then able to get BlueIris to read these as 'cameras' of type rtmp ... and then you can do what you want with them.

The solution is also scalable ... you can have multiple mics connected to multiple sbc's ...only catch is that every mic (usb) needs a cable connecting it to the nearest sbc. The sbc's themselves connect to the network (the one that BlueIris can access) preferably via ethernet but wifi may also work in limited cases.

No additional software is needed other than the rtmp server (but if you have another one somewhere on your network, then you don't even need one on the sbc) since I used ffmpeg which is bundled with most linux distros.

------------------------------------------------------------------------------------------------------------------------------------
Details:

On the sbc ... (running linux ... as root user ... 'sudo')


First I had to find the hardware address of the mic. I used "arecord" ...

arecord -l

My output was :

** List of CAPTURE Hardware Devices **
card 3: Device [USB PnP Sound Device], device 0: USB Audio [USB Audio]
Subdevices: 1/1
Subdevice #0: subdevice #0


This meant I should use "hw:3,0" to identify the mic ... card 3 and device 0. Your case may be different of course.

Next, I identified the available formats etc.

arecord --dump-hw-params -D hw:3,0

My output was :

HW Params of device "hw:3,0":
--------------------
ACCESS: MMAP_INTERLEAVED RW_INTERLEAVED
FORMAT: S16_LE
SUBFORMAT: STD MSBITS_MAX
SAMPLE_BITS: 16
FRAME_BITS: 16
CHANNELS: 1
RATE: [44100 48000]
PERIOD_TIME: [1000 1000000]
PERIOD_SIZE: [45 48000]
PERIOD_BYTES: [90 96000]
PERIODS: [2 1024]
BUFFER_TIME: [1875 2000000]
BUFFER_SIZE: [90 96000]
BUFFER_BYTES: [180 192000]
TICK_TIME: ALL
--------------------
arecord: set_params:1387: Sample format non available
Available formats:
-
S16_LE


I decided to use 1 channel, a sample rate of 44100 and the S16_LE (16 bit little endian) format.

Next, I set up a RTMP server on the sbc ... I used nginx-rtmp ... there are many web pages describing that setup

Finally, I used ffmpeg to send mic to rtmp server:

ffmpeg -re -f alsa -c:a pcm_s16le -channels 1 -sample_rate 44100 -i hw:3,0 -loop 1 -i /960x540.jpg -fpsmax 5/1 -f flv rtmp:/127.0.0.1:1935/live/audio1

What these options mean:
-re : read input at native frame rate (otherwise it can buffer and create extra latency per my understanding)
-f alsa : alsa format for the mic input
-c:a pcm_s16le : this is the format (16bit little endian).
-channels 1 : mono
-sample_rate 44100 : the audio sampling frequency of the signal
-i hw:3,0 : the input for the mic (obtained using "arecord -l")
-loop 1 : for the video, I use a static jpg and loop
-i /960x540.jpg : a blank image file ... this is the 'video' feed. Needed for BlueIris
-fpsmax 5/1 : framerate
-f flv rtmp:/127.0.0.1:1935/live/audio1 : flash video output to RTMP server.

I needed to create a jpg file and add it as the "video" stream ... I failed to get BlueIris to accept a camera that is audio-only. So I used a static image and looped it. You can use any jpg.

At this point the RTMP feed should be visible on the status page of the RTMP server. Here is my screenshot ... you can see the /live/audio1 feed

1716510695346.png

Notice that the audio codec is MP3. We can change it to any of the formats that ffmpeg supports ( 'ffmpeg --formats' will list them ... it's a long list!)
e.g. to send it as aac , add the flag

-c:a aac before the final -f flv flag ... for 16bit pcm, use -c:a pcm_s16le ... etc
e.g.:
ffmpeg -re -f alsa -c:a pcm_s16le -channels 1 -sample_rate 44100 -i hw:3,0 -loop 1 -i /960x540.jpg -fpsmax 5/1 -c:a aac -f flv rtmp:/127.0.0.1:1935/live/audio1


You can now view the stream on any machine. In my experience, ffplay without any buffers gives the lowest latency.

ffplay -fflags nobuffer rtmp:/127.0.0.1:1935/live/audio1

I tested this and it appears contemporaneous for any practical requirement (but not quite - a normal ear should pick it up the slight offset - mine did ... but then I am not quite a bot yet ... ;))


At this point the work moves on to BlueIris ...


On BlueIris:


On BlueIris, add a camera, go to the Configure page, and create a camera along the lines below (192.168.4.100 is the ip address of the rtmp server)

1716510895196.png


Notes :
1) It should be http:// and not rtmp:/ ... I have no idea why ... I could not get the feed working using the rtmp:/ dropdown. http:// works
2) Model : RTMP Flash ... this is important
3) the /live/audio1 is in the Main section and the Audio is blank
4) I don't think the Send RTSP keep-alives does anything useful, and I reduced the buffer a bit.


And on the audio tab enable audio and select the IP stream of the current camera:

1716487968442.png

And that's it.


Disable/Enable the camera, go back to the Audio Tab of the camera, and click the "Audio Analysis" button. If your feed is working (like mine is), you should seem something there like the below ...


1716511491472.png


And there u have it!
--------------------------------------------------------------------------------------------------------------------------------------------------------------------------

With a slight mod to the ffmpeg command, I was able to additionally send the recording to mp3 files (in 15mt chunks)

fmpeg -re -f alsa -c:a pcm_s16le -channels 1 -sample_rate 44100 -i hw:3,0 -loop 1 -i /tmp/960x540.jpg -fpsmax 5/1 -f flv - | ffmpeg -i - -vcodec copy -acodec copy -f flv rtmp:/127.0.0.1:1935/live/audio1 -acodec copy -f segment -segment_time 900 -segment_format mp3 /tmp/myaudio-%05d.mp3

The above command sent a stream to the RTMP server and additionally piped it to mp3 files called myaudio-xxxxx.mp3 - each of those files are 900 secs (15 mts) long.

The latency on BlueIris was a lot higher than using ffplay with no buffers (which feels almost contemporaneous) - I spent time trying to chase this down but in vain ... there is a 2-3 second latency. I suspect that the "receive buffer" for the camera matters ... but BlueIris won't allow me to reduce it below 0.5Mb and there is just a trickle coming in at ~300kb/s so even a half meg is over a second of delay.
Similar delays are also experienced using rtmp streams sent by my cameras ... when I read them as "rtmp flash camera" on BlueIris, the feed is lagged by ~3s relative to using ffplay. Is there a way to have really tiny buffers in BlueIris for a camera... say around 100kb ?

Me no bot!

:)
 
Last edited:

nabman

n3wb
Joined
Sep 3, 2020
Messages
8
Reaction score
6
Location
NY
After some searching, I got to a setup where I can use bluetooth mics and speakers - it is no longer necessary to have wires running all over! And this is 2-way communication ... using both mics and speakers at various 'nodes' (where the mics and speakers are located).

First, some preamble on the issues I ran into ... it required a bit of head scratching and a lot of googling ... there don't seem to be many examples on the web of how to read data from a bluetooth mic using ffmpeg. Most of the examples use arecord and stream that to a file (which is not really useful in this setup), so at first I tried a solution where I piped the output from arecord to ffmpeg. This worked but there were two problems I encountered -
  1. The raw audio coming out of arecord was in the format pcm_u8 (8kHz mono). Unfortunately the Flash Video specs don't accept this as I found out with frustration- the audio sampling frequency must be 11025, 22050 or 44100 Hz. After a little head scratching, I was able to overcome this - it just meant that the stream needed to be converted/re-sampled on the fly, so I used the lame decoder to reencode the stream. i.e. I went : arecord | lame mp3 encoder | ffmpeg ... where the '|' are pipes. This 'worked' and I got excited and thought I was done ... but it led to issue #2 ...
  2. The lame encoder used up cpu resources and added a delay. On my raspberry pi it kept choking up every so often (since lame and ffmpeg used 1 core - no multi-core loading was possible)! Additionally, the resulting delay somehow ended up being 5 seconds or more! This was unacceptable!

Finally, I stumbled upon a trivial solution using ffmpeg and pulseaudio - regretably this is not well documented (at least I struggled to find it). In my testing the solution only introduces an extra delay of about 60ms when using a bluetooth mic/speaker. This is acceptable (and unavoidable). I'll describe it in the nodes section below.

The one-way transit time for a signal traveling from a mic at one 'node' to a speaker at another node (using RTMP as the protocol to transport data across my wired lan) was 529ms and that rose to 586ms when the usb-mic was replaced with a bluetooth mic. I'll give more details on the measurement approach segment below.

A transit time of ~600ms may not be good enough for real time work such as singing alongside someone at the other end, to play a real time game or to have a heated argument ... but for security monitoring it may be ok ...?

On to the setup itself

External Mic/Speaker Setup


The idea is to have an audio comm setup that runs on the lan using RTMP.

Conceptually it is easiest to think of the setup in terms of 'nodes'. The pragmatic solution you finally end up with may club multiple nodes together, but keeping them separate is easier to describe/understand.

Each node = a sbc (like the Raspberry Pi 4 but it is an overkill - you can get away with a smaller/cheaper one like Orange Pi Zero 2 with just 1Gb of RAM). The nodes run linux.

Every 'node'
  • is connected to the local LAN network somehow (preferably via wired ethernet but wifi is also possible - it'll just add to the latency). It must have an unique IP address (e.g. 172.20.24.25 - a random IP in the private address space that I just made up).
  • has a mic connected to it. The mic could be plugged into the a/v jack, be connected using usb or connected wirelessly via bluetooth.
  • has a speaker connected to it. The speaker could be plugged into the a/v jack (like headphones), be connected using usb or connected wirelessly via bluetooth.
  • has a RTMP server running on it (we could use a central one, but the setup is easier to understand/build this way)
  • anything that is picked up by the mic will be streamed out to the rtmp server at rtmp:/127.0.0.1:1935/live/mic
  • anything that is streaming at rtmp:/127.0.0.1:1935/live/speaker will be played on the speaker
i.e. a node has a 'mic' and a 'speaker' for others in the network to avail of. Others can read from this mic and play on this speaker - using the RTMP protocol.

A setup can have multiple nodes ... one at the front door, in the back yard, in the attic, on your desk next to you, etc. and they will each have their own unique IP address, their own RTMP server and their own mic/speaker streams.
From any node (e.g. the one on your desk), you can
  • listen to what is being picked up on any remote node's mic (by playing rtmp:/172.20.24.25:1935/live/mic) and ...
  • play whatever your local mic picks up on the remote speaker (by publishing to rtmp:/172.20.24.25:1935/live/speaker).

This establishes a 2-way communication between your desk and the node out there in your yard! You can hear them and they can hear you.
And any monitoring software (such as BlueIris) will be able to pick up these streams.

Now on to some details.


A Node

Preliminary steps (which I won't cover here):

  • The node must be running linux - any flavor is fine. It must be connected to your network . I will not describe these here. I'll just assume that the ip address of this node is 172.20.24.25 ...
  • The node must have a RTMP server running on it - I recommend nginx-rtmp. There are many how-to's on the web for this. With a debian based distro, you can pick up nginx-rtmp from the repositories but some distros (notably Arch Linux) do not have it in their global repositories. In such cases, you can install docker and run nginx-rtmp in a container - I've done this and can confirm that it works like butter.
  • If you plan to use bluetooth components (mic and/or speaker), you need to ensure that they are connected and ready - I will not cover this step here.
  • Ensure that pulseaudio is installed, configured and running. ( use 'pulseaudio --start' if it is not running)


Publishing the mic to rtmp:/127.0.0.1:1935/live/mic

The signals received by the mic at this node will be stream-able from that address to other nodes. This node becomes the 'mic' for other nodes to hear.

Wired/USB mic:
If you are using a wired mic (usb or coaxial), then the steps I described in my earlier post using an usb-mic will work. Just find the hardware location etc. like in the earlier post and use the command

ffmpeg -re -f alsa -c:a pcm_s16le -channels 1 -sample_rate 44100 -i hw:3,0 -loop 1 -i /1x1.jpg -r 5 -flvflags no_duration_filesize -f flv rtmp:/127.0.0.1:1935/live/mic

here, I've used a jpg file that is 1pixel by 1pixel ... so it is tiny. I'm attaching it here in case you want to use it. Otherwise, this command is very similar to the one I provided earlier so I won't give any more details. The command can be either started manually or you can make a systemd service file and enable it. It runs at 5 fps (the '-r 5' option)
If you wish to additionally record whatever the mic picks up, you can use

ffmpeg -re -f alsa -c:a pcm_s16le -channels 1 -sample_rate 44100 -i hw:3,0 -loop 1 -i /1x1.jpg -r 5 -flvflags no_duration_filesize -f flv - | ffmpeg -i - -vcodec copy -acodec copy -f flv rtmp:/127.0.0.1:1935/live/mic -acodec copy -f segment -segment_time 900 -segment_format mp3 /tmp/myaudio-%05d.mp3

This will publish to the rtmp server as flash video and also write the audio to mp3 files each being 15 mts long. The files will be in the /tmp/ directory ... if you go this route, ensure you have enough disk space!


Bluetooth mic:
If you are using a bluetooth mic, first enable it and ensure that it is the 'default' mic. Then change the 'hw:3,0' field to 'pulse' ... that's it! The Pulse libraries will do all the conversions etc. So the equivalent commands for the bluetooth mic are

ffmpeg -re -f alsa -c:a pcm_s16le -channels 1 -sample_rate 44100 -i pulse -loop 1 -i /1x1.jpg -r 5 -flvflags no_duration_filesize -f flv rtmp:/127.0.0.1:1935/live/mic

ffmpeg -re -f alsa -c:a pcm_s16le -channels 1 -sample_rate 44100 -i pulse -loop 1 -i /1x1.jpg -r 5 -flvflags no_duration_filesize -f flv - | ffmpeg -i - -vcodec copy -acodec copy -f flv rtmp:/127.0.0.1:1935/live/mic -acodec copy -f segment -segment_time 900 -segment_format mp3 /tmp/myaudio-%05d.mp3


[...and if you wish to contain the level of logging (the default will dump a lot of 'info') ... just add the flag "--loglevel error" or "--loglevel quiet" to the ffmpeg command]


... screenshot of the stream status - mostly audio ...

1716757363416.png


Playing rtmp:/127.0.0.1/live/speaker on the speaker

The speaker connected to this node will be fed with whatever shows up at that address (most likely 'published' to from another node). This node becomes the 'speaker' for others to play to.

This is the easy part ... whether you have a wired speaker or a wireless/bluetooth speaker, first make sure that it is the default sink for all sounds. Next, issue the command (on the sbc):

ffplay --fflags nobuffer rtmp:/127.0.0.1:1935/live/speaker

... either run it manually (and leave it running) or just make it into a systemd file that fires up when the sbc starts. Now anything that is published to the rtmp feed will be played on the speaker.


Node to Node connections

Ok ... now all the nodes are set up and we also have a node sitting on our desk ... how can we listen to a mic on a distant node and also how do we play our mic on that distant node's speaker?

  • To listen to the distant node's mic (assume that its IP is 172.20.24.25) issue the command : ffplay --fflags nobuffer rtmp:/172.20.24.25:1935/live/mic ... the remote mic will play on your desktop's speakers
  • To stream your mic to the distant node's speaker issue the command : ffmpeg -re -f alsa -c:a pcm_s16le -channels 1 -sample_rate 44100 -i hw:3,0 -loop 1 -i /1x1.jpg -r 5 -flvflags no_duration_filesize -f flv rtmp:/172.20.24.25:1935/live/speaker ... (replace 'hw:3,0' with 'pulse' if you are using bluetooth on the desktop) - your mic will play on the distant speaker


To read the distant mic on BlueIris, follow the setup of a camera as described in my earlier post. Use 172.20.24.25 for the IP and \live\mic for the mic input. Reduce the receiving buffer to the minimum of 0.5Mb. This will minimize the latency. All else is the same.

...and that is it - the building blocks described above can be adapted to your setup!


Node to Node transit time

Assume that we have 2 nodes : NodeA and NodeB. Also assume that we've set it up so that NodeA's mic is played on NodeB's speaker. The question is, "how long does it take to go from NodeA's mic to NodeB's speaker?"
To measure this,
  • we need to be able to physically locate NodeA's mic next to NodeB's speaker. Now anything that plays on NodeB's speaker will also get picked up by NodeA's mic (and relayed back to NodeB's speaker).
  • any sound picked up by NodeA's mic will make its way to NodeB's speaker and get picked up again by NodeA's mic as an 'echo' ... which'll then play back as an echo's echo, and so on.
  • the time difference between the echoes is the time it takes to transit from NodeA's mic to NodeB's speaker.
so we use the command to record NodeA's mic while publishing the stream at NodeB's speaker and use Audacity (or something similar) to measure the separation between the original signal and the echo.

Assume NodeA is at 172.20.24.1 and NodeB is at 172.20.24.2.

On NodeA, issue the command:

ffmpeg -re -f alsa -c:a pcm_s16le -channels 1 -sample_rate 44100 -i hw:3,0 -loop 1 -i /1x1.jpg -r 5 -flvflags no_duration_filesize -f flv - | ffmpeg -i - -vcodec copy -acodec copy -f flv rtmp:/172.20.24.2/live/speaker -acodec copy -f segment -segment_time 900 -segment_format mp3 /tmp/myaudio-%05d.mp3

Next, tap NodeA's mic sharply (with a pencil or something similar) to create a sharp "tick" ... this will play back on NodeB's speaker, get picked up on NodeA's mic, etc. Stop the stream and look at the recorded file /tmp/myaudio-00000.mp3 ... it will have the echoes we need!
If you use a bluetooth mic, replace 'hw:3,0' with 'pulse' in the above command.

I did this experiment and have 2 audio files (both are attached in a zip file so u can listen to them : Node2Node.zip)
  1. USB2USB.mp3 ... this is a test using USB mic to USB speaker ... the Audacity screenshot shows the transit time as 529ms
  2. BT2USB.mp3 ... this is a test using Bluetooth mic to USB speaker ... the Audacity screenshot shows the transit time as 586ms
So bluetooth added 57ms to the transit. I assume that Bluetooth to Bluetooth will add another ~60ms.

1716748604955.png
 

Attachments

Last edited:
Top