H. Swanson
Getting the hang of it
I don't want to repeat a bunch of stuff that's already posted on the Wiki, so I'll try to keep it to lessons I learned specific to my experience in the hope of helping others.
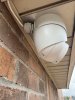
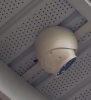
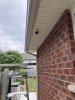
1. For soffit installation, I highly recommend using the 1/16" aluminum sheets off Amazon (link below); they're plenty strong but super thin so that it keeps the soffit close to its original configuration. The sheets I got are 6" wide because I have turret cams. I cut the sheets with a hacksaw. In a couple of cases, the depth of the soffit plus gutter made me concerned about IR reflection, so I mounted the cam as far forward as possible and the added junction boxes which created enough distance. In other cases, the soffit was shallower (no gutters) because they're mounted under a bay window, so I mounted the cams further back to better protect from the elements. You'll obviously need to get separate screws and nuts of the appropriate size to screw the junction box onto the sheet.
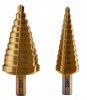
2. If you're putting the cabling through the aluminum sheet, buy metal boring bits (also recommend cutting fluid) off Amazon to make the hole big enough--Tony has a link below. A regular drill bit will not be big enough.
3. I used junction boxes for all cameras. In some cases, I ran the cable through the cable gland vs drilling a hole because of difficulty running the cable to that location. I got 3/4" cable gland reducers off Amazon but that wasn't enough to seal around the Ethernet cable, so I bought rubber grommets but had to get just the right measurements so that they'd seal around the cable but also allow the reducer to clamp around it. This method worked beautifully...no sealant required. You'll just need to cut a slit (box cutter made it simple) in each grommet so you can wrap it around the Ethernet cable. Edit: Links to rubber grommets and cable gland reducers:
4. Use tiny, white rubber washers on the camera base plate screws just like what comes with the metal screws on the junction box. This will keep the screws from falling down when unscrewing them and keep them attached to the base plate. Because I didn't use the mounting screws that came with the junction box, I just stole the washers off those screws and added them to the camera mounting plate screws.
I did pay a professional to run all the cabling but I prepared all of the aluminum sheeting (cut to the right size, burrs/corners sanded) with junction box screws/nuts, holes drilled, etc. This saved a lot of time and a lot of holes being drilled into my house. The installer was impressed with this method and it saved him a lot of time/effort.
That's all I can think of. The installation is solid for all seven cameras, and they're operating great. Feel free to ask questions or provide feedback.
1. For soffit installation, I highly recommend using the 1/16" aluminum sheets off Amazon (link below); they're plenty strong but super thin so that it keeps the soffit close to its original configuration. The sheets I got are 6" wide because I have turret cams. I cut the sheets with a hacksaw. In a couple of cases, the depth of the soffit plus gutter made me concerned about IR reflection, so I mounted the cam as far forward as possible and the added junction boxes which created enough distance. In other cases, the soffit was shallower (no gutters) because they're mounted under a bay window, so I mounted the cams further back to better protect from the elements. You'll obviously need to get separate screws and nuts of the appropriate size to screw the junction box onto the sheet.
2. If you're putting the cabling through the aluminum sheet, buy metal boring bits (also recommend cutting fluid) off Amazon to make the hole big enough--Tony has a link below. A regular drill bit will not be big enough.
3. I used junction boxes for all cameras. In some cases, I ran the cable through the cable gland vs drilling a hole because of difficulty running the cable to that location. I got 3/4" cable gland reducers off Amazon but that wasn't enough to seal around the Ethernet cable, so I bought rubber grommets but had to get just the right measurements so that they'd seal around the cable but also allow the reducer to clamp around it. This method worked beautifully...no sealant required. You'll just need to cut a slit (box cutter made it simple) in each grommet so you can wrap it around the Ethernet cable. Edit: Links to rubber grommets and cable gland reducers:
4. Use tiny, white rubber washers on the camera base plate screws just like what comes with the metal screws on the junction box. This will keep the screws from falling down when unscrewing them and keep them attached to the base plate. Because I didn't use the mounting screws that came with the junction box, I just stole the washers off those screws and added them to the camera mounting plate screws.
I did pay a professional to run all the cabling but I prepared all of the aluminum sheeting (cut to the right size, burrs/corners sanded) with junction box screws/nuts, holes drilled, etc. This saved a lot of time and a lot of holes being drilled into my house. The installer was impressed with this method and it saved him a lot of time/effort.
That's all I can think of. The installation is solid for all seven cameras, and they're operating great. Feel free to ask questions or provide feedback.
Last edited:
As an Amazon Associate IPCamTalk earns from qualifying purchases.