Changed ISP, broke cameras in BI

XtremeAaron

Young grasshopper
Joined
Mar 13, 2016
Messages
61
Reaction score
8
I changed ISPs yesterday, including routers and now my cameras show "no signal".

What information can I provide to help get this working again?

I am willing to start over totally if needed.

Thank you.
 

Enrique

Young grasshopper
Joined
Nov 28, 2017
Messages
42
Reaction score
10
Log into your new router as admin and take a look at what the new environment looks like. What is the default IP address distribution scheme (ie 192.168.x.y or maybe 10.10.x.y)? Do you see any of your cameras registered with the router as devices?
 

tangent

IPCT Contributor
Joined
May 12, 2016
Messages
4,342
Reaction score
3,524
Change the range used for DHCP and assign static IPs or use DHCP reservation to assign specific IPs to each camera. Then update the ip addresses for each camera in BI
 

XtremeAaron

Young grasshopper
Joined
Mar 13, 2016
Messages
61
Reaction score
8
My WAN DHCP in the router is a 68.XXX.XXX.XXX. The old IPs for the cameras in BI are a 192.XXX.XXX.XXX
 

Philip Gonzales

Getting comfortable
Joined
Sep 20, 2017
Messages
697
Reaction score
551
My WAN DHCP in the router is a 68.XXX.XXX.XXX. The old IPs for the cameras in BI are a 192.XXX.XXX.XXX
What about your LAN DHCP scope? WAN DHCP address doesn't matter for connecting the cams on your LAN to the Blue Iris Server also on your LAN. The first 3 sections (octets) of the LAN DHCP scope much match your camera IP's. For instance if one of your cams has an address of 192.168.1.11 then your dhcp range on your router needs to be 192.168.1.x. The first three sections must match. Do they?
 

XtremeAaron

Young grasshopper
Joined
Mar 13, 2016
Messages
61
Reaction score
8
The LAN DHCP is 192.168.x.x to ending range 192.168.x.xxx. My camera IPs do not exceed the ending range. Im wondering if I have a port issue, its been a long time since I set this up, thanks for your help.
 

Philip Gonzales

Getting comfortable
Joined
Sep 20, 2017
Messages
697
Reaction score
551
From your blue iris server can you open command prompt and type ipconfig \all and take a screenshot of the results and post it here. Also type ping 192.168.x.x but replace the X's with the ip address of one of the cameras. After each command you type press enter. No harm I sharing your internal IP addresses as these are only relevant to your LAN.

Are the cameras IP addresses static? If they were assigned via DHCP then their IP addresses likely changed. Before running the commands above can you still access the cameras web pages using their IP address? If not check to see if they got a new IP address in the DHCP lease section of your router. If you like I could teamviewer in and have a look . Up to you.
 

XtremeAaron

Young grasshopper
Joined
Mar 13, 2016
Messages
61
Reaction score
8
I was able to get the indoor amcrest camera so show back up in BI, but my 2 exterior Dahua cams are still gone. Here's a view of my amcrest ip finder and the BI page that I got it working with. I attempted to ping those IPs but there's no response from them.
 

Attachments

Philip Gonzales

Getting comfortable
Joined
Sep 20, 2017
Messages
697
Reaction score
551
I was able to get the indoor amcrest camera so show back up in BI, but my 2 exterior Dahua cams are still gone. Here's a view of my amcrest ip finder and the BI page that I got it working with. I attempted to ping those IPs but there's no response from them.
Ok, so on your camera you likely have a 24bit mask. If you expand the subnet column on your first screenshot it is likely 255.255.255.0 (this means the first three octets (sections) of all IP addresses on your network must match). I asumme the 192.168.0.7 camera is the one that works? If so your router IP address is 192.168.0.1. This means you need to change the ip address of the Dahua cameras from 192.168.1.x to 192.168.0.x. Also change the default gateway in the cams to 192.168.0.1

Then modify the ip address in blue iris to match.
 
Last edited:

XtremeAaron

Young grasshopper
Joined
Mar 13, 2016
Messages
61
Reaction score
8
Everything you said is correct. I attempted to change those using the IP config that I screenshotted earlier, but it keeps failing. How do I change these?
 

Philip Gonzales

Getting comfortable
Joined
Sep 20, 2017
Messages
697
Reaction score
551
Everything you said is correct. I attempted to change those using the IP config that I screenshotted earlier, but it keeps failing. How do I change these?
You may be able to change the IP address of these cams with the Dahua Config Tool, but I haven't had much luck or patience trying that method.

The easiest way for me to change the IP addresses of the cams is set a windows computer to match the IP range of the cameras that you want to change. This will allow you to log into the camera via web browser, change it's IP address to the desired range. repeat for all cameras needing this and then change your computer back to DHCP or Static IP address.

Here are the steps you will need to do.

1. Find a windows computer that is connected to your router either via Wifi or Hardwired.

2. Change the computers IP address to a static one in the range of 192.168.1.X. For example use 192.168.1.50 for the for IP address field and 255.255.255.0 for the subnet mask. Gateway and DNS IP address will not matter as you only need to communicate with the IP cams at 192.168.1.x. I linked some instructions below just in case. Scroll down to "Set a Static IP Address in Windows 7, 8, or 10". Make sure you select the adapter that currently has internet, so either hardwired or wifi adapter.

How to Assign a Static IP Address in Windows 7, 8, 10, XP, or Vista

3. Connect to cameras from any web brower (chrome, IE, Etc) at http://192.168.1.109:8530 and http://192.168.1.110:8531. and log in using admin credentials.

4. Navigate to Settings>Network>TCP/IP and change the IP address fields to 192.168.0.109 and 192.168.0.110 for each cam, change the Default Gateway to 192.168.0.1. Not sure what you have for DNS setting but if it starts with 192.168 then change it to 192.168.0.1 if not leave the DNS value alone. At this point your Cams will be on the same subnet (network) as your router.

5. Change the IP address of your network adapter of the computer back to DHCP (Or if it was static already change it back to what it was before starting these steps). Same steps in the instructions excep instead of typing in an IP address select "Obtain an IP address automatically".

How to Assign a Static IP Address in Windows 7, 8, 10, XP, or Vista

6. Log into blue iris server and right click on the camera(s) and go to properties>Video tab>Configure. Change the IP address to 192.168.0.109 and 192.168.0.110. Hit "OK" a couple of times to get out of the config boxes for blue iris and then the cam should load.

Let me know if you have any questions or issues.
 

XtremeAaron

Young grasshopper
Joined
Mar 13, 2016
Messages
61
Reaction score
8
Thank you so much! I have the cameras back up and running!

Next goal is to figure out the webserver function until I'm able to redo my raspberry pivpn
 

Philip Gonzales

Getting comfortable
Joined
Sep 20, 2017
Messages
697
Reaction score
551
Thank you so much! I have the cameras back up and running!

Next goal is to figure out the webserver function until I'm able to redo my raspberry pivpn
Sweet, glad you were able to get the cams reconnected to Blue Iris. I actually port forward one port for the Blue Iris webserver even though I have a VPN setup. It's just easier and it's not as insecure as forwarding ports for the cams themselves.

Here are the high level steps for setting up the Web Server in Blue Iris (it's been a while so the steps won't be as detailed). This assumes you want to access Blue Iris remotely via Android/iphone app and/or through the browser.

1. Make sure Blue Iris has a static IP address. If it does not the address can change and you will not be able to access Blue Iris Remotely. I would personally give it a higher number, something like 192.168.0.100. (note: Subnet mask will be 255.255.255.0 and Default Gateway will be 192.168.0.1. DNS can be set to automatic option.) This will ensure that the IP address will likely never be used by DHCP unless you have more than 100 devices on your network. (There is a better ways to do this via DHCP reservation but I can give you more info on that later if you wish).

2. Log into your router via the web browser as an admin, should be something like http://192.168.0.1 and find the section for port forwarding. You may need to google port forwarding on "Netgear Nighhawk R7000" (Replace with your brand and model) if you have trouble finding it as sometimes the menus can be a little tricky.

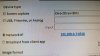
For the IP address of the port forwarding put the IP address of your Blue Iris server. So you would put 192.168.0.100 or whatever address you have set. For the port number you can pick any value. It's not advised to use port 80 as this is commonly used for websites and it will be easy for someone to find your site by scanning your public IP address for port 80. I personally use 81, but you can use 12345 or literally any number up to 65535. Make sure to hit Save your changes and continue to the next step.

3. Open up Blue Iris and go to Settings> Web Server Tab and select the Check box for Enable the Webserver on this port. Enter whatever port number you used in step 2. Since all my info is already populated I can't recall if Blue Iris automatically populates your IP address info but for the LAN access field on the Web Server page it should be http://192.168.0.100:81 (or whatever address and port you used in step 2). For the field for WAN access it should be http://publicipaddress:81. If it doesn't auto populate you can get your public IP address from your router or by going to this site below. You can even type in what is my ip address in google and it will give it to you.

I would also make sure the option about refreshing your External IP address every 30 minutes is selected. You likely do not have a static IP address so this will automatically change the value in Blue Iris if it does change.

What Is My IP Address? IP Address Tools and More

3. Click on Remote access Wizard on the bottom left of the Web Server Tab. This will walk you through the webserver setup wizard. Anywhere where it shows a port number it should have the port which you setup in step 2, anytime it shows a LAN IP address it should be the one set for Blue Iris and forwarded in step 2, and anytime it says WAN IP address it should be your public IP address that we found in step 3. After going through the wizard if you did everything right (or should I say if I explained everything right) then you should be good to go.

You can test to make sure it is setup correctly by going to http://192.168.0.100:81 (replace with whatever IP and port you pick if different) from the browser in any LAN connected device. This means the web server works on your LAN. Log in just to make sure it is working.

I don't remember if Blue Iris let's the default admin account log in or not. I don't think it does but I could be wrong. What I did was go to Settings>Users>Add. Create a username and password, check the administrator check box if you want to be able to make setting changes from the Blue Iris App (Such as changing the profile - very useful). Then hit OK. Use this login to login to the webserver/Blue Iris app.

Then you can test your port forwarding by getting on any device not on your LAN (cell phone disconnected from home wifi would probably be the easiest way) and going to http://publicipaddress:81. Again if you get a log in page you are probably good.

After you verify it's working you can setup the Blue Iris App on your phone if you desire. If you go to Blue Iris setting>About it will list the first 5 and last 5 digits of your Blue Iris Key. Enter this in the app and hit GET IPS and it will fill in your info. Then you just have to enter the username and password and you will be good to go.


Let me know if you are able to get this setup or if you have issues. After this you can setup the different profiles in the Advanced section in the Web Server tab. This will help to ensure a smooth experience based on your home upload speed/WAN device download speed. For instance if you are in a low signal area you can easily switch the profile to a lower bandwidth profile and still access your camera streams without issue.
 
Last edited:

XtremeAaron

Young grasshopper
Joined
Mar 13, 2016
Messages
61
Reaction score
8
Thanks again!

I took a break from this last night, but I did just setup the webserver without issues.

Two things I'm curious about, can I set an auto logout (timeout?) for the BI Android app? Maybe there is one already but I noticed while testing, if I just hit home the BI server still shows me connected. I'd like to not have to hit menu>logout each time. Also, how can I test to how vulnerable the webserver is?
 

fenderman

Staff member
Joined
Mar 9, 2014
Messages
36,897
Reaction score
21,250
Thanks again!

I took a break from this last night, but I did just setup the webserver without issues.

Two things I'm curious about, can I set an auto logout (timeout?) for the BI Android app? Maybe there is one already but I noticed while testing, if I just hit home the BI server still shows me connected. I'd like to not have to hit menu>logout each time. Also, how can I test to how vulnerable the webserver is?
the app logs off on its own after 30-45 seconds or so
 

Philip Gonzales

Getting comfortable
Joined
Sep 20, 2017
Messages
697
Reaction score
551
Thanks again!

I took a break from this last night, but I did just setup the webserver without issues.

Two things I'm curious about, can I set an auto logout (timeout?) for the BI Android app? Maybe there is one already but I noticed while testing, if I just hit home the BI server still shows me connected. I'd like to not have to hit menu>logout each time. Also, how can I test to how vulnerable the webserver is?
Well testing how vulnerable your webserver is, is kind of tough. I mean that's almost like asking how likely my house to be broken into. (Maybe that's a bad example, I am known for making bad comparisons lol). Running scans will give you some information but it's kind of hard to understand what it means. And just because it passes all the tests doesn't mean a new vulnerability won't be found later.

I've used this website from beyond sercurity before. I believe after you enter your info they will email you the results on a recurring basis. Not sure how good their scans are. Someone may have more information on this.

ScanMyServer: Test the security of your website, web server or blog - Free!

There are some linux based scanners that you can run yourself but they are pretty complicated. Honestly I wouldn't worry about it too much if you are just forwarding your blue iris server port and nothing else.
 

XtremeAaron

Young grasshopper
Joined
Mar 13, 2016
Messages
61
Reaction score
8
Well, something happened and my remote viewing has broken.

I checked what is my IP on the machine and it's giving me an ipv6 address instead of the ipv4. It also broke chrome remote desktop.

Any ideas on how to resolve this issue?
 

bp2008

Staff member
Joined
Mar 10, 2014
Messages
12,666
Reaction score
14,006
Location
USA
What is giving you an ipv6 address?

What is receiving the ipv6 address?

If your internet provider is no longer providing a public IPv4 address then ... well ... I don't know. My ISP doesn't provide ipv6 addresses yet so I don't know what is involved for incoming access.
 

XtremeAaron

Young grasshopper
Joined
Mar 13, 2016
Messages
61
Reaction score
8
I got this figured out. About a week ago my ISP turned on ipv6, I had to disable ipv6 on the bi machine to get my ipv4 address back. Also had to reopen/forward my port. All is back to normal.
 
Top