CAMERA POSITIONING HELP

windguy

Getting comfortable
Joined
Sep 25, 2019
Messages
285
Reaction score
289
Location
Pacific Coast
After many weeks of testing with first a B5442 varifocal and then a T5442 fixed (2.8mm, 3.6mm and 6.0mm), I'm trying to finalize the testing phase of our install of five outdoor cameras. The biggest problem we are stumbling on is the front entry area. The coach lights on both sides of the door are causing too much flare for night time images because the camera is pointing straight towards the door. I was warned ahead of time by poster Looney2ns that this was going to be a problem, and he was right as usual, but we can't seem to find a workable solution so I'm reaching out to the forum for help. The day time image is great. The main purpose of this camera view is to monitor porch pirate activity, door kick-in activity but mostly to see who is at the front door since we don't answer the door unless we are aware of a visitor or delivery. One thought is to figure out a way to dim these two coach lights. All coach lights (qty 5) are on one circuit and we want to maximize light output at the other locations. The entry lights each have a single LED bulb, 3.3w (40w equivalent). 2700K softwhite, 300 lumens. One thought is to do some type of frosting of the lamp side glass or find a frosted bulb that puts out less light. We also have the incadescent 25w bulbs that were there before the LEDS so we can try those for testing purposes.

There will be a camera positioned that captures the approach to the entry area and we are contemplating moving that camera from the original eave position (Location A) at about 90" to a lower level birdhouse (Location B), about 36" off the ground. In theory this would capture a good face shot before the person enters the entry area. We are pretty well sold on the birdhouse solution but that means running conduit underground, so it's preferred that the entry solution match to avoid running conduit underground and also along the eaves, double work, but possible. I guess this is a second question in terms of what's best for the pad location camera, Location A or B.

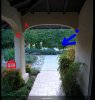
Attached are a group of pics showing the entry and pad and snapshots off of video when testing.

ENTRY AREA
Location A and B are on the stucco. Location A hides the camera better and makes running conduit easier and less obvious. Location B conduit isn't very good looking. Location C would be in a birdhouse mounted on a pole with conduit running underground. If we run conduit underground for Pad Location B, it would be easier to continue that run to Entry Location C just a few feet away.

entry 01.JPGentry 02.JPGentry 03.JPGentry location A.jpgentry location A night.jpgentry location B.jpgentry location C.jpg

PAD VIEW
We have tested two locations, Location A under the eaves and Location B in a birdhouse. As mentioned above, Location B offers a nice low position to capture a quality face image and we're leaning towards that location.

pad 01.JPGpad location A.jpgpad location B.jpg

Sorry for the long post. Appreciate any thoughts. Thanks!
 
Last edited:

mat200

IPCT Contributor
Joined
Jan 17, 2017
Messages
13,649
Reaction score
22,738
HI @windguy

Looks like position A is a bit too high...

Here's another position I would test... anyone walking up to the front door will miss it the first time around ;-)
 

Attachments

windguy

Getting comfortable
Joined
Sep 25, 2019
Messages
285
Reaction score
289
Location
Pacific Coast
Looks like position A is a bit too high...
Here's another position I would test... anyone walking up to the front door will miss it the first time around ;-)
Thanks mat200. I agree that A is a bit high but it's a convenient mounting location. I did not test out your suggested location but can give it a try. I did try the center of the arch over the walkway, which is even higher and not very good. The reason I like the view from Location A, B or C) is packages are often left on the left side of the door mat tucked away, but sometimes on the mat leaning on the door and on Saturday, the FedEx guy went to the right side, which is very unusual. I'm guessing not the normal Mon-Fri delivery guy. I'd like the camera to be able to capture the whole landing area for packages. Not sure your suggested spot will help with the light flare problem but will test it. It might be that I'll have to accept that this won't be the best night time viewing camera but better during the day. If that's the limitation, then location C mounted in a birdhouse, nice and low, might be the better call. Thanks!
 

windguy

Getting comfortable
Joined
Sep 25, 2019
Messages
285
Reaction score
289
Location
Pacific Coast
Just wanted to add a note, that I'm limited to where I can add conduit or wiring.
Adding Cat5e to the inside of the house in the entry area and punching through the stucco is not possible.
Conduit runs are limited to the front of the house, coming from the garage area, underground or along the eaves as marked in red below. Thanks!

entry 01 conduit.jpg
 
Joined
Dec 22, 2019
Messages
27
Reaction score
6
Location
Arizona
your entry look identical to ours, I put one in a fake lite over door, and one in a large mail box lower half looking toward the door, so still get stuff dropped in mail box, but also what I did was put a security door in, the delivery person can slide it under door, which has worked, they put it down and kick it in when the door is locked. worked for us, we have a shorter side opening though
 

looney2ns

IPCT Contributor
Joined
Sep 25, 2016
Messages
15,521
Reaction score
22,657
Location
Evansville, In. USA
Almost always a way to get wire where you need it, neatly.
Hire an electrician that is certified in low-voltage. Have him run ethernet cable inside the wall to the position just above the door bell at 4-5ft right next to the door.
Use this camera at that location with a 2.8mm lens. Front door ID camera IPC-HDBW4231F MiniWedge
Then use position A for a camera to watch from that angle, put that camera in corridor mode.

Or use this camera in that same location by the door, Review-dahua-ipc-hdbw4231f-e2-m-dual-starlight-cam again in 2.8mm, one lens looking down at the package area, and the other for face ID standing at the door.
Paint any to match stucco.
 

windguy

Getting comfortable
Joined
Sep 25, 2019
Messages
285
Reaction score
289
Location
Pacific Coast
@looney2ns - thanks for the ideas. I've seen the mini-wedge used by other forumites and it's a great solution for a low profile camera. But running Cat 5e through inside walls would be too invasive in this situation and not worth the trouble for the sake of improving one camera mounting. I had considered doing this but it doesn't make sense. I'll just have to deal with optimizing the other mounting locations. Thanks!
 

windguy

Getting comfortable
Joined
Sep 25, 2019
Messages
285
Reaction score
289
Location
Pacific Coast
Did ya try and give it a bunch of HLC backlight?
Thanks bigredfish. This might be exactly what I'm looking for to cut down on the head on glare from the coach lights. No, I didn't try it because I wasn't aware what it is, but now I do. Appreciate your pointing that out. I haven't explored all the camera settings yet with the plan to work on image optimization after the cameras are mounted and BI is installed. I see the HLC setting for the camera using the web browser interface under the Backlight Mode. HLC has a scale of 1-100. Will test that range tonight and report back. Thanks!
 
Last edited:

windguy

Getting comfortable
Joined
Sep 25, 2019
Messages
285
Reaction score
289
Location
Pacific Coast
Try 60-70 for starts. It may not fix the problem but worth a try.
Thanks for the starting reference.
I did some late afternoon baseline testing and then at dusk with the coach lights on.
The camera settings are in BACKLIGHT MODE, not under CONTRAST as posted above.
HLC or Highlight Compensation is called Glare Inhibition if using Smart PSS, which I am for testing. Web interface calls it HLC.
I tried 50 and 70 and there were certain parts where the facial image was okay, but overall the image was darkened too much. Not really an improvement.

But, there was another Backlight Mode that worked much better, BLC or Backlight Correction. Using the default setting, the facial image was better with more defined detail and the overall image wasn't as dark compared to when HLC was enabled.

Below are pics of the testing: baseline with coach lights off and some daylight, dusk with lights on, HLC enabled and then BLC enabled. I didn't test BLC in daylight but hoping it won't affect the daytime image as greatly as HTC did. So Bigredfish, you still earned your beer points for the day by steering me in the right direction for adjusting the camera. A have a lot more to learn. Much appreciated! Thanks!

BACKLIGHT MODE SETTINGS: OFF, BLC, HLC, WDR and SSA

entry location c - daylight.jpgentry location c - dusk.jpgentry location c - HLC enabled = 70.jpgentry location c - BLC enabled.jpg
 
Top