Parking lot light pole camera install

inforlonghaul

Getting the hang of it
Jul 12, 2015
78
38
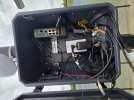
Finally after several months of having this project on my mind, we finally pulled the trigger and got it done. Thanks to a wonderful maintenance crew who were able to help get the power sorted and getting it wired up into the box, made my camera install a lot less complicated.

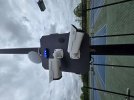
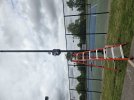
Here's the end result. The inside setup is a little janky, but for being my first time doing this kind of project, I'm just thrilled it's done and working like a champ. We ordered the box and supplies from Amazon. I thought the 'blue light' on the box was a nice added touch to hopefully get people's attention that there are security cameras watching. This parking area runs right along two city streets that T into each other, but is still kind of secluded from everything, especially at night. The area still tends to see activity at night, from people walking/exercising late at night, or um, other extracurricular activities. Maybe the folks that notice will perhaps have some tiny sense of security and peace of mind, while also hopefully serving as a deterrent.

Wanted to post these pictures here, just in case it helps somebody else out there who maybe has this idea and wants to DIY it. Feel free to critique.

Edit:
Also wanted to add: the pictures don't show where I went back and caulked around the camera base and other holes that were drilled. Just FYI.
 

Attachments

  • 20250424_121453.jpg
    20250424_121453.jpg
    390.8 KB · Views: 0
  • 20250424_121616.jpg
    20250424_121616.jpg
    572 KB · Views: 0
  • 20250424_121258.jpg
    20250424_121258.jpg
    398 KB · Views: 0
For future reference, Romex is generally not acceptable to be ran inside of conduit and you want to run individual conductors.

Do you have a link to the enclosure?
 
  • Like
Reactions: inforlonghaul
Thanks!

I thought I probably should ground those ethernet protectors, but wasn't sure what I should attach it to. Not sure if just putting a screw in one of those holes on the mounting plate would be sufficient. Thoughts?

Yes, holes had to be drilled to mount the cameras on the front. Not ideal, but the only way I could get this to work the way I needed. If anybody finds themselves in the same situation, I caulked both the holes on the inside of the box and also caulked around the base of the cameras on the outside of the cover, except the bottom strip so any moisture had a place to escape and also even caulked the screws on the outside.

Yeah, I thought Romex wasn't supposed to be ran inside conduit, but the maintenance crew had a short 6 inch piece of rounded PVC conduit that they used to penetrate into the pole and the box so that's the only portion in conduit. I thought they might at least use armored cable, but that's all they had. Fortunately the rest of the wiring is concealed up inside the light pole, but is not in conduit.

Here's the link ob Amazon to the box ordered.

Sorry for the shortened URL, I copied it from my phone using the Amazon Shopping app.
 
As an Amazon Associate IPCamTalk earns from qualifying purchases.
  • Like
Reactions: Gimmons and Ri22o
Thanks!

I thought I probably should ground those ethernet protectors, but wasn't sure what I should attach it to. Not sure if just putting a screw in one of those holes on the mounting plate would be sufficient. Thoughts?

Nice job, thanks for sharing and the pix.

Yes, they definitely need to be grounded properly in order to do their job. I have used them in the past and have had to replace them when they did their job and protected the cable where they were installed from ESD induced by a nearby lightning strike.

The light pole should be properly grounded and if so that is where I would tie them. If that pole is not properly grounded then someone dropped the ball as that pole is within easy reach of the public.

I'd use at least #10 pure copper, insulated or bare, as short as possible and with as few bends as possible and tie to the pole IF it's properly grounded. If it's not, I'd start there because if it's not, something gets pinched, that pole gets "hot" and someone gets shocked or, God forbid, electrocuted you'll get the blame even if it had nothing to do with your work.
 
  • Like
Reactions: looney2ns
Nice job, thanks for sharing and the pix.

Yes, they definitely need to be grounded properly in order to do their job. I have used them in the past and have had to replace them when they did their job and protected the cable where they were installed from ESD induced by a nearby lightning strike.

The light pole should be properly grounded and if so that is where I would tie them. If that pole is not properly grounded then someone dropped the ball as that pole is within easy reach of the public.

I'd use at least #10 pure copper, insulated or bare, as short as possible and with as few bends as possible and tie to the pole IF it's properly grounded. If it's not, I'd start there because if it's not, something gets pinched, that pole gets "hot" and someone gets shocked or, God forbid, electrocuted you'll get the blame even if it had nothing to do with your work.
Let me pick your brain then for advice as I want to do this right, for sure. I do know, when the maintenance crew ran the wiring, I saw a big 1 inch bolt inside the pole that the existing wiring had their grounds hooked into. The crew attached the grounding wire to that same bolt as well and then ran it up to the GFCI outlet inside the camera box, I'm hopeful that means it's all been properly grounded.

Would me getting like a 1ft piece of copper wire, then coming up inside the camera box from the bottom to attach those ethernet grounding wires to, then screwing the other end of the copper wire with a self tapper directly into the side of the pole be sufficient? Or do I need to run that copper ground all the way down inside the pole and attach it directly to that grounding bolt be the only way for successfully grounding? Would it be too dangerous for me to pull that GFCI out and tap into that grounding wire and run a pigtail through a knock out attach it physically to the inside of the box, grounding the whole box?

You can tell I'm a bit out of my element on this part but I want to do the best I can to make sure it's safe as possible.
If you're sure they tied all those grounds you described either to a driven ground rod in the foundation OR to the pole's anchor bolts, then I would tie your 1 ft. piece to that same bolt. :cool:
 
If you're sure they tied all those grounds you described either to a driven ground rod in the foundation OR to the pole's anchor bolts, then I would tie your 1 ft. piece to that same bolt. :cool:
Okay, will definitely need more than 1ft as that bolt is at the base of the pole, so more like a 15 ft piece haha. Now I just need to game plan getting the grounding wire out of the box and into the pole down down there.
 
Okay, will definitely need more than 1ft as that bolt is at the base of the pole, so more like a 15 ft piece haha. Now I just need to game plan getting the grounding wire out of the box and into the pole down down there.
Naw, if you are sure the pole is properly grounded make it a foot or so out of the box's bottom and into the pole, thraed screw bolt into drilled & tapped hole, maybe 1/4-20.
Crimp a captive lug or use a servit lug on that wire to fasten onto the new bolt for that new threaded hole. Use copper wire and copper or AL-CU alloy plated lugs.

Sorry about the late response, was getting IV chemo 0900 -1300 and had a bad reaction to my 3rd oxyplatnin in 9 weeks (SP?).
Was scarey; could not talk, swallow or cough for an hour; BP high, right hand spasmed into a claw; was not a stroke, thank you Jesus.
My typing is worse. :oops:
 
Last edited:
Naw, if you are sure the pole is properly grounded make it a foot or so out of the box's bottom and into the pole, thraed screw bolt into drilled & tapped hole, maybe 1/4-20.
Crimp a captive lug or use a servit lug on that wire to fasten onto the new bolt for that new threaded hole. Use copper wire and copper or AL-CU alloy plated lugs.

Sorry about the late response, was getting IV chemo 0900 -1300 and had a bad reaction to my 3rd oxyplatnin in 9 weeks (SP?).
Was scarey; could not talk, swallow or cough for an hour; BP high, right hand spasmed into a claw; was not a stroke, thank you Jesus.
My typing is worse. :oops:
Our thoughts are with you my man.
 
  • Like
Reactions: TonyR
  • Like
Reactions: looney2ns
Naw, if you are sure the pole is properly grounded make it a foot or so out of the box's bottom and into the pole, thraed screw bolt into drilled & tapped hole, maybe 1/4-20.
Crimp a captive lug or use a servit lug on that wire to fasten onto the new bolt for that new threaded hole. Use copper wire and copper or AL-CU alloy plated lugs.

Sorry about the late response, was getting IV chemo 0900 -1300 and had a bad reaction to my 3rd oxyplatnin in 9 weeks (SP?).
Was scarey; could not talk, swallow or cough for an hour; BP high, right hand spasmed into a claw; was not a stroke, thank you Jesus.
My typing is worse. :oops:
Sorry to hear that. I wish you all the best.
 
  • Like
Reactions: TonyR
We did some cameras on light poles. Used point to multipoint ubiquiti radios. Biggest problem was power to the light poles was very high voltage so their electrician installed a few step down xformers....so the only time the outside cams mounted on the poles worked was when the outside lights came on.

Not a big deal because during the day we had plenty of cams that overlooked everything. And everyone was there working. 1 AP mounted on the main bld and 7 stations on the light poles to feed 2-3 cameras at each pole for nightime. I made two trips just to show the step down xformers were bad before they called their electrician 1st. The loss of 1 pole with a station radio and 2-3 cameras should have let them know...because the others were all working.

I didn't know until that job a light pole had so much voltage...... :idk: Still cheaper tham trenching the lot to install 120v power to each pole we used.
 
  • Like
Reactions: inforlonghaul
We did some cameras on light poles. Used point to multipoint ubiquiti radios. Biggest problem was power to the light poles was very high voltage so their electrician installed a few step down xformers....so the only time the outside cams mounted on the poles worked was when the outside lights came on.

Not a big deal because during the day we had plenty of cams that overlooked everything. And everyone was there working. 1 AP mounted on the main bld and 7 stations on the light poles to feed 2-3 cameras at each pole for nightime. I made two trips just to show the step down xformers were bad before they called their electrician 1st. The loss of 1 pole with a station radio and 2-3 cameras should have let them know...because the others were all working.

I didn't know until that job a light pole had so much voltage...... :idk: Still cheaper tham trenching the lot to install 120v power to each pole we used.

That's very interesting!

I was under the impression that the light poles here were 277v. I wondered how they would pull a 120v off it. I too thought some sort of stepdown transformer was going to be needed like you mentioned. While it still doesn't make a whole ton of sense to me since most electrical is above my head, they explained that the way the wiring was ran inside the pole they could pull a 120 off it, There were 4 wires inside the pole, I believe. I think I saw a red, black, white, and a green ground. Somehow, I guess there were two 120v lines and that's what brought it up to 277v they said (but the math ain't mathing). They tapped into one of those lines to pull a 120v without needing any kind of transformers. When the poles were installed, they used 'eyes' on top of the light fixture so it works out perfectly that there's continuous power.
 
  • Like
Reactions: observant1
When the poles were installed, they used 'eyes' on top of the light fixture so it works out perfectly that there's continuous power.
Those "eyes", more commonly known as a "PEC" for "PhotoElectric Cell", it's used when the light fixture is always hot and the PEC does the dusk-to-dawn switching. If it's a NEMA twist-lock PEC you can actually determine from the ground the fixture's switching voltage by the color of the PEC. They can be had all the way up to 480 Volt! :cool:

Of my 31 years in signals and lighting, 25 were spent at county and city government where parking lots and maintenance facilities had tons of parking lot and outdoor lighting that I dealt with, including get 120 volts from the 277 volt parking lot lighting to charge the battery of a police portable speed radar display unit that would parked near one of the poles when it was not in the field.
 
  • Like
Reactions: inforlonghaul
Since 277v has come up let me explain why the "odd' voltage since most of us know about 120 and 240 volt, as in residential, split-phase, 3 wire ciircuits but some may not know about the reasoning behind 277 volt lighting. :cool:

In many industrial settings that run large electrical machinery and motors or just large office buildings with lots of lighting, they require 480 volts / 3 phase power, stepped down by transformers from the incoming utility high voltage primaries ( in KV's or thousands of volts).

The 480v ran throughout the plant or building and many large 480 to 120/240 volt step down transformers had to be installed to furnish power to lighting. Finally someone got the bright idea, not sure how long ago, to manufacture 277v lighting ballasts for fluorescent tubes and the HID (mercury vapor, high pressure sodium, metal halide) high-bay lighting fixtures and to provide an additional (new) winding on the secondary of the 480v stepdown transformers that would be 277 volts to to ground, eliminating the need for all those bulky, expensive 480v to 120/240v transformers that were just for lighting. Now those 120/240v stepdowns could be much smaller and cheaper to furnish needed 120/240 control voltages and some 120v lighting. Also 24 VAC would still be needed as before for control voltage in many of those machinery electrical and motor circuits, furnished by 480/277v or 120/240v stepdowns to 24VAC.

Still, you can see that the advent of 277 volt lighting lowered the cost and bulk of special 480 to 120/240 stepdowns just for lighting. The 480v to 120v/240v stepdowns are still needed to a degree but are MUCH smaller since they don't have to supply as much wattage as before...the advent of 277v lighting helped with that.
 
Last edited:
  • Like
Reactions: aesterling