What is the IP address of your computer? If it's not on the 192.168.1.x subnet you won't "see" it at all.
There are three ways to fix this kind of problem -
1 - Use the Dahua config tool to initialize the camera and change its' IP address to match your network IP scheme.
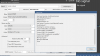
2 - Use Control Panel > Network and Internet > View Network status and tasks > Change adapter settings > select the active network interface > right click on it and select properties > Select Internet Protocol Version 4(TCP/IPV4) and select Properties > Change the IP address of the computer to one in the 192.168.1.x subnet > Click OK > click Close After configuring the camera and changing its' IP address to match your original network scheme follow these same steps and change your computer back to its' original configuration.
3 - Follow the steps above and and in the "Properties" that shows your IP address but do not change it, click on "Advanced" and add an IP address in the 192.168.1.x range. This will keep your current configuration and allow access to the 192.168.1.x subnet as well.
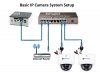
Also, do not connect the camera to a router, connect it through a network switch or directly to your computer. When changing the IP address of the camera do not use DHCP. Use a fixed address that is out of the range of addresses assigned by your router.

 Dammit all. Another thing to check tomorrow. Oh that reminds me. I need a new router ...I pulled mine out of the trash. wont update past 2012 on dates! D-link.