hermaninthehood
Getting the hang of it
I thought I would share my latest install on a brick wall, with painting to match. Not too much out there on painting save a few videos on youtube, and a few threads here, so thought maybe this can help some guys.
I get all my gear from @EMPIRETECANDY Andy what a nice dude.
Now, the intention of this post wasn't to really talk about dome's vs turrets (I have several 5442 turrets as well, they are excellent) but inadvertently I'm sure it'll come up. So I'll make a few notes on this particular camera.
This install is the IPC-HDBW5442R-ASE-NI. Full Time Color, 3.6mm lens. 0.001LUX. (compared to 0.002 on the 5442 Turrets)
Same 1/1.8" sensor, but It also has more memory 1GB (ASE-NI) vs 512MB (Turret) to help with the extra processing for the full color.
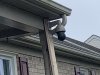
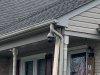
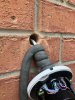
I know some guys don't like dome's so much, but in the right situation this is an excellent camera. For this particular install, it is fully protected on all sides, on top and in front, so I have no glare issues, and the 0.001 is fantastic as is the full time color. (you can absolutely notice the difference vs 5442 Turret)
More importantly it was the look I wanted for this location and install. In my opinion it is more minimal and sleek when finished and painted, and slightly smaller overall than Turret. (no gap from the eyeball to base of the camera)
For me the ASE-NI cameras are excellent value and performance. I've talked with andy about it lots, and shown him other installs and samples from full color. they shine IMO.
Anyways enough on that you'll see below I wanted the minimal cleaner in my opinion look (no junction box) for this location.
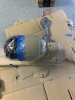
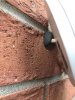
So to achieve the minimalist install, clearly I drilled 1" hole thru brick. I've done 15/16" and 7/8" before but to me it's just a hassle to get the pigtail thru. So save yourself the aggravation and just do 1" if you want the full pigtail to go thru.
next I duct seal the pigtail wire going in to help with the insulation. note it will never be perfectly sealed but if you take your time and stuff it down its best you can do and more than sufficient.
on this one I did approx. 7-8 inches of duct seal down the hole - and i'll have caulking seal around the camera anyways...
now to mounting.. I would usually use tapcon's in concrete or brick, but unfortunately the smallest 3/16 tapcon (requiring a 5/32 pilot drill hole) the heads don't fit the camera base.
I didn't want to enlarge and drill out the base of the camera, and again I didn't want to use a junction box for the slimmer look (tapcon's work great with inside junction boxes there is room for the tapcon head)
So I just used the anchors and screws supplied with the camera. They work fine. I've read about some guys say about them being inadequate, but if installed properly (1/4" pilot for anchor) they're perfectly fine.
You don't need overkill, the camera is rock solid with the "come with" anchors and screws and not going anywhere. Just be careful lining up your pilots for the anchors in concrete or brick.
(yes i accidentally had the wrong bit (larger) on when I started the left side hole, but it's ok i caught myself and only made a nice flush taper opening (unnecessary) for the head.
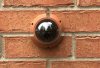
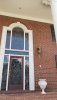
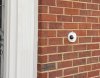
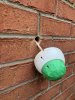
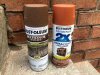
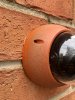
OK now to the real intention of sharing this pos.. the brick color camouflaged painting! I have a pretty standard reddish/orange brick color, so I used a rust-oleum color called Satin Cinnamon.
The Cinnamon color was a little brighter and shinier than I though (only later I found a "Flat Red" color from the same brand that might have been similar or better, but overall I'm happy with the outcome.
I've seen a few example online of people who used a red, bright red, cherry red, apple red, etc - all too bright for me.
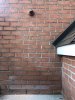
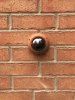
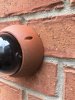
Then I also topped off with a light coat of textured spray (first time ever using this) and it worked out well so far.
You can see the test swipes on the right side. I went back and forth to how much and what I was going to do, but ended up with the original plan. 1 nice coat of the cinnamon and a light coat of the brown textured.

Ok so that's really it. I'm happy with the results. only time will tell how long it lasts and stands up haha.
...Oh last step to clear caulking seal around the camera, but i cant seem to find my tube of it so gotta go to the store to get another one.
longtime reader, seldom poster, so i thought i'd try to give back a little bit")
I get all my gear from @EMPIRETECANDY Andy what a nice dude.
Now, the intention of this post wasn't to really talk about dome's vs turrets (I have several 5442 turrets as well, they are excellent) but inadvertently I'm sure it'll come up. So I'll make a few notes on this particular camera.
This install is the IPC-HDBW5442R-ASE-NI. Full Time Color, 3.6mm lens. 0.001LUX. (compared to 0.002 on the 5442 Turrets)
Same 1/1.8" sensor, but It also has more memory 1GB (ASE-NI) vs 512MB (Turret) to help with the extra processing for the full color.
I know some guys don't like dome's so much, but in the right situation this is an excellent camera. For this particular install, it is fully protected on all sides, on top and in front, so I have no glare issues, and the 0.001 is fantastic as is the full time color. (you can absolutely notice the difference vs 5442 Turret)
More importantly it was the look I wanted for this location and install. In my opinion it is more minimal and sleek when finished and painted, and slightly smaller overall than Turret. (no gap from the eyeball to base of the camera)
For me the ASE-NI cameras are excellent value and performance. I've talked with andy about it lots, and shown him other installs and samples from full color. they shine IMO.
Anyways enough on that you'll see below I wanted the minimal cleaner in my opinion look (no junction box) for this location.
So to achieve the minimalist install, clearly I drilled 1" hole thru brick. I've done 15/16" and 7/8" before but to me it's just a hassle to get the pigtail thru. So save yourself the aggravation and just do 1" if you want the full pigtail to go thru.
next I duct seal the pigtail wire going in to help with the insulation. note it will never be perfectly sealed but if you take your time and stuff it down its best you can do and more than sufficient.
on this one I did approx. 7-8 inches of duct seal down the hole - and i'll have caulking seal around the camera anyways...
now to mounting.. I would usually use tapcon's in concrete or brick, but unfortunately the smallest 3/16 tapcon (requiring a 5/32 pilot drill hole) the heads don't fit the camera base.
I didn't want to enlarge and drill out the base of the camera, and again I didn't want to use a junction box for the slimmer look (tapcon's work great with inside junction boxes there is room for the tapcon head)
So I just used the anchors and screws supplied with the camera. They work fine. I've read about some guys say about them being inadequate, but if installed properly (1/4" pilot for anchor) they're perfectly fine.
You don't need overkill, the camera is rock solid with the "come with" anchors and screws and not going anywhere. Just be careful lining up your pilots for the anchors in concrete or brick.
(yes i accidentally had the wrong bit (larger) on when I started the left side hole, but it's ok i caught myself and only made a nice flush taper opening (unnecessary) for the head.
OK now to the real intention of sharing this pos.. the brick color camouflaged painting! I have a pretty standard reddish/orange brick color, so I used a rust-oleum color called Satin Cinnamon.
The Cinnamon color was a little brighter and shinier than I though (only later I found a "Flat Red" color from the same brand that might have been similar or better, but overall I'm happy with the outcome.
I've seen a few example online of people who used a red, bright red, cherry red, apple red, etc - all too bright for me.
Then I also topped off with a light coat of textured spray (first time ever using this) and it worked out well so far.
You can see the test swipes on the right side. I went back and forth to how much and what I was going to do, but ended up with the original plan. 1 nice coat of the cinnamon and a light coat of the brown textured.
Ok so that's really it. I'm happy with the results. only time will tell how long it lasts and stands up haha.
...Oh last step to clear caulking seal around the camera, but i cant seem to find my tube of it so gotta go to the store to get another one.
longtime reader, seldom poster, so i thought i'd try to give back a little bit